Linux Backups via Back-In-Time
One of the main reasons that people give for not performing backups is that it is too difficult. The Back In Time program solves that issue for anyone using Linux, Ubuntu, Redhat, Slackware, etc. Both Gnome and KDE version are available.
Back-In-Time uses file system hardlinks to manage snapshots efficiently. This trick has been used for 20+ years on UNIX operating systems to provide backups. That means it has been well proven, but it also means this technique doesn’t work on Windows because hardlinks in Windows work differently. After the first complete copy is made to the backup area, any snapshots made after that point use hardlinks for each file that doesn’t change. Basically, it costs ZERO storage to make additional hardlinks. Neato.
Install
On Ubuntu, there is a KDE or a Gnome package version available. Choose either:
$ sudo apt-get install backintime-kdeor
$ sudo apt-get install backintime-gnomewill install it. If you prefer synaptic, that’s fine too.
Managing the snapshots intelligently is something that Back In Time has built-in. The Smart Remove setting seems to be just that – smart removal. Here’s screen shot with the description.
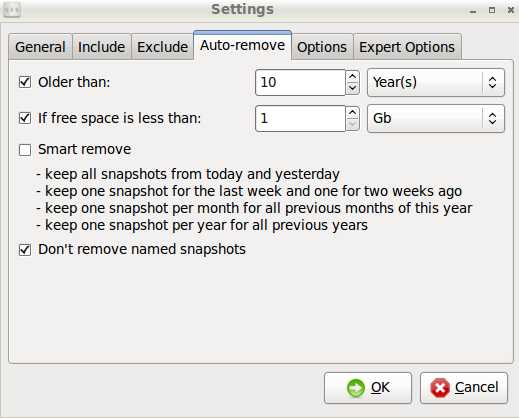
The GUI also let’s you setup how often snapshots are taken (10 minutes, 20 min, hourly, once a day, once a month) how long each is retained and an archival schedule. It is really very impressive. The best part of this tool is that you have what appears to be a 100% copy of every file for every snapshot taken, but in reality, only files that change are copied. Files that did not change only have 1 copy and all other references are links back to the main file. That’s the magic of hardlinks. When you look in the backup area, you’ll see complete file systems with all files there. To recover a file, simply copy it back to your main working area using any tool you would normally use.
The schedule control is really a cron task, but the GUI hides that fact. You set it in the GUI and the program manages the cron tasks for you.
This method of backups is fantastic for normal or small files, but it can become a problem for large files like virtual machine images or full length video files that are added and removed all the time. This activity will force many, many copies of large files to be made and force your backup area to grow to become huge. Nobody wants that for unimportant data. However, for pretty much any other type of files, this method is ideal.
If you aren’t doing any backups, Back-In-Time is a great way to get started. Be certain that you backup to a different physical disk, or to a network server or NAS device. If you do that, you’ll be just fine.
Down Side
The only down-side that I see for this tool, is there doesn’t appear to be a built-in network browser. We really want to place our backups on the network, not on a local disk drive. We can use NFS or sshfs to remotely mount storage on another Linux/UNIX machine. The main thing is that the target file system needs to support hardlinks – it can’t be NTFS.
More Information
Here’s a 10 minute podcast about Back-in-Time for those with 10 minutes to listen.
There’s also a LIfehacker article on Back-In-Time.
Other Less Easy Options
I’m still a huge fan of rdiff-backup as you can see from the 10+ articles here on it. That doesn’t mean Back-In-Time in not appropriate for many people. Both of these methods are good.
There are some other scripts that perform backups using hardlinks too.
- rdup-simple
- rdup-snapshot
- rdup – build your own backup programs from rdup
- duplicity – encrypted, incremental backups
Less Easy doesn’t mean hard, it just means there isn’t a GUI.
Some other Linux Backup Software Options.
List Backup Software, operating systems support and license used. We like GPL software best.
Trackbacks
Use the following link to trackback from your own site:
https://blog.jdpfu.com/trackbacks?article_id=838

